Project Perfect Mod Forums
:: Home :: Get Hosted :: PPM FAQ :: Forum FAQ :: Privacy Policy :: Search :: Memberlist :: Usergroups :: Register :: Profile :: Log in to check your private messages :: Log in ::


The time now is Thu Apr 25, 2024 9:50 am
All times are UTC + 0
My quick blueprint tutorial
Moderators: Global Moderators, Red Alert 2 Moderators
Post new topic   Reply to topic Page 1 of 1 [12 Posts] Mark the topic unread ::  View previous topic :: View next topic
Author Message
Roadwarrior
Energy Commando


Joined: 15 Jan 2007
Location: Oklahoma

PostPosted: Mon Jul 13, 2009 9:48 pm    Post subject:  My quick blueprint tutorial Reply with quote  Mark this post and the followings unread

How to use blue prints to make a voxel.(You should use this with the pics in Roaches tutorial.)

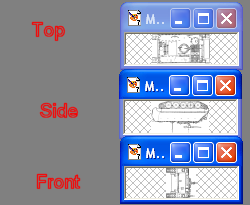
First you find a blue print of what type of vehicle you want. It should have Three facings: Top, Side, and Front.
The reason is so you have a more accurate idea of what to do.NOTE: IT HAS TO BE A GOOD QUALITY BLUEPRINT Other wise when you resize it, you'll have nothing good. Example:Good blueprint,Good. Bad Blueprint,Bad. The reason it's bad is because it's a solid line and when you resize it, it will have incomplete lines. What you do want is antialias lines like in the "Good" one, also bigger blueprints help too. And if the turret blends in with the body when you resize it, Undo the resize and paint it red, now you know where the turret is and where the body is.

02.
Now you have your blue print, you need to crop each view(top,side,front) so you have each in it's own file.
After this you need to re-size them to a more suitable size.(Though, who wouldn't want to drive around with a tank the size of the map.)

3.
Compare the sizes of the image's after you resize Example: the Top views height should be the same or really close to the width of the front view. Now that you checked and re-sized the image a whole lot you can take the exact size and put it in the voxel parameters of VSEIII but wait, you should make it bigger by 1 on each parameter so the blueprint wont get in the way when your voxeling.

I'll be using a 10x10x10 voxel as an example.
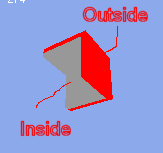
4.) After you type the parameters in to the voxel and click OK, Fill the top,side(Depends on the blueprint if its left or right) and front with a bright color like red then do the same on the layer right behind the red with grey.


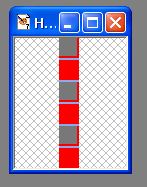
5.) Now click on this icon in VSEIII It ill take you here:

Now save it where ever you want.

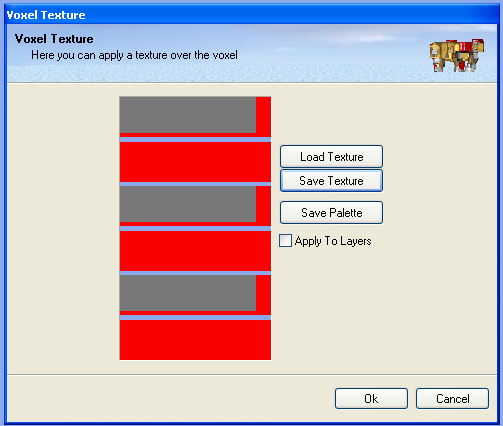
6.)Now its time to add the blueprints, open it in an image program like PS or PSP or something that can have more them one image open. When you open it it will look like this:

The red is where you put the blueprints it goes like this: Top,Side,Front(Those are the reds in order) But before you ad them you need to make sure that there facing the correct way.(See pic I'm using my M113A3 as an example)Note:the Side I'm using is the left side.

Put them in and save the texture, load it in VSEII and your done with that now remove the grey layers after you add the blueprint to VSEIII and then save the texture.

NOTE:if want you me to explain something post here and I'll see what I can do.

_________________

Last edited by Roadwarrior on Wed Jul 15, 2009 8:01 pm; edited 10 times in total

Back to top
View user's profile Send private message Skype Account AIM Address
crevio
Commander


Joined: 19 Apr 2009

PostPosted: Tue Jul 14, 2009 2:07 am    Post subject: Reply with quote  Mark this post and the followings unread

#Fart So tell me something, do you actually copy and paste the resized images in vxlIII editor, or do you put the picture to the side and use it as a reference guide.

Back to top
View user's profile Send private message
MT
General


Joined: 23 Jun 2008
Location: Wandering Time

PostPosted: Tue Jul 14, 2009 2:31 am    Post subject: Reply with quote  Mark this post and the followings unread

crevio wrote:
#Fart So tell me something, do you actually copy and paste the resized images in vxlIII editor, or do you put the picture to the side and use it as a reference guide.

Copy and paste.

Back to top
View user's profile Send private message
crevio
Commander


Joined: 19 Apr 2009

PostPosted: Tue Jul 14, 2009 4:11 am    Post subject: Reply with quote  Mark this post and the followings unread

I hate to keep pestering about this subject, but all the tuts on this subject explain IMO nothing. But then again I'm one of those people why they created books for Dummies Very Happy Some things I get and some things I just dont, this is one of them. Let me run this down.
I downloaded a blue print, opened it up with PS CS3 extended. I cropped the 3 images, so now I have 4 images on the page, the main and the 3 cropped views. now I resized them to what I wanted them to be. Now this is where I get lost. Do I save the images seperately, and in what format do you save them in, cause there is no .vxl format choice in PS CS3 extended. Simply trying to C/P them dosent work, vxlIII editor wont allow me too.

Back to top
View user's profile Send private message
Roadwarrior
Energy Commando


Joined: 15 Jan 2007
Location: Oklahoma

PostPosted: Tue Jul 14, 2009 6:52 am    Post subject: Reply with quote  Mark this post and the followings unread

Oh I for got about adding them......Ill add that tomorrow.(I told you it was quick #Tongue)

_________________

Back to top
View user's profile Send private message Skype Account AIM Address
Roadwarrior
Energy Commando


Joined: 15 Jan 2007
Location: Oklahoma

PostPosted: Tue Jul 14, 2009 6:42 pm    Post subject: Reply with quote  Mark this post and the followings unread

I had this all typed out then when i go to upload the pics Photobucket crashed Firefox.

I'll be using a 10x10x10 voxel as an example.
1.) After you type the parameters in to the voxel and click OK, Fill the top,side(Depends on the blueprint if its left or right) and front with a bright color like red then do the same on the layer right behind the red with grey.


2.) Now click on this icon in VSEIII It ill take you here:

Now save it where ever you want.

3.)Now its time to add the blueprints, open it in an image program like PS or PSP or something that can have more them one image open. When you open it it will look like this:

The red is where you put the blueprints it goes like this: Top,Side,Front(Those are the reds in order) But before you ad them you need to make sure that there facing the correct way.(See pic I'm using my M113A3 as an example)Note:the Side I'm using is the left side.

Put them in and save the texture, load it in VSEII and your done.

_________________

Back to top
View user's profile Send private message Skype Account AIM Address
crevio
Commander


Joined: 19 Apr 2009

PostPosted: Wed Jul 15, 2009 1:11 am    Post subject: Reply with quote  Mark this post and the followings unread

Um, for some reason I dont think I did this right, Did I? If so is this used as a template then, is that what its for?


f-105_000.gif
 Description:
 Filesize:  240.09 KB
 Viewed:  6267 Time(s)

f-105_000.gif


Back to top
View user's profile Send private message
ConMan
Tiberian Beast


Joined: 16 Dec 2008
Location: Toronto, Canada

PostPosted: Wed Jul 15, 2009 1:43 am    Post subject: Reply with quote  Mark this post and the followings unread

Crevio, yes that is the gist of it

I've attached a template for a t80 tank that is incomplete, that anyone can download and see, and perhaps finish.

I'm not very good with doing voxels with blueprints, but in the future I'm gonna try and perfect this technique Razz


#2gunfire Good luck


t80.vxl
 Description:

Download
 Filename:  t80.vxl
 Filesize:  133.11 KB
 Downloaded:  267 Time(s)


Back to top
View user's profile Send private message
crevio
Commander


Joined: 19 Apr 2009

PostPosted: Wed Jul 15, 2009 5:22 am    Post subject: Reply with quote  Mark this post and the followings unread

Thanks for all the help on this matter. Although i couldnt figure it out with PS CS3, I was able to do it with Jasc PaintShop Pro9, seems to have the perfect features for this Wink

Back to top
View user's profile Send private message
Roadwarrior
Energy Commando


Joined: 15 Jan 2007
Location: Oklahoma

PostPosted: Wed Jul 15, 2009 6:46 am    Post subject: Reply with quote  Mark this post and the followings unread

Well this is how I do all my blueprint voxels, your blueprint has no detail Crevio, what resize did you use in PSP9? I have PSP7 and I use the smart size and it keeps the detail(The detail on the blueprint also matters). Also you want to remove the grey layers after you add the blueprint(Added). The blueprint is just a guide for more precise voxeling not instant voxel, and you need to compare with all of the views and not just the one your using.

EDITED the beginning.

_________________

Back to top
View user's profile Send private message Skype Account AIM Address
crevio
Commander


Joined: 19 Apr 2009

PostPosted: Wed Jul 15, 2009 3:35 pm    Post subject: Reply with quote  Mark this post and the followings unread

I used smart size too. that was just a crappy blue print i used to see if i was doing it correctly. I got it down pat now, thanks agian Road Warrior for all your help.

Back to top
View user's profile Send private message
Roadwarrior
Energy Commando


Joined: 15 Jan 2007
Location: Oklahoma

PostPosted: Wed Jul 15, 2009 7:58 pm    Post subject: Reply with quote  Mark this post and the followings unread

No problem, I'm glad to help.

_________________

Back to top
View user's profile Send private message Skype Account AIM Address
Display posts from previous:   
Post new topic   Reply to topic Page 1 of 1 [12 Posts] Mark the topic unread ::  View previous topic :: View next topic
 
Share on TwitterShare on FacebookShare on Google+Share on DiggShare on RedditShare on PInterestShare on Del.icio.usShare on Stumble Upon
You cannot post new topics in this forum
You cannot reply to topics in this forum
You cannot edit your posts in this forum
You cannot delete your posts in this forum
You cannot vote in polls in this forum
You cannot attach files in this forum
You can download files in this forum


Powered by phpBB © phpBB Group

[ Time: 0.1586s ][ Queries: 14 (0.0121s) ][ Debug on ]