Posted: Sun Sep 29, 2013 8:35 pm Post subject:
Bridges
Subject description: You can't destroy them
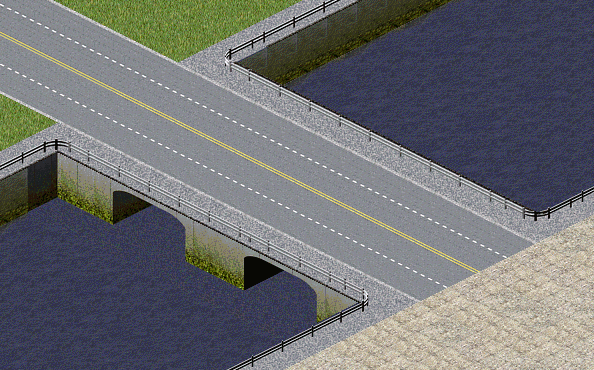
Finishing up a project long over due. I made a bridge in 3d max and managed to copy the texture for the walls. You won't be able to destroy these bridges, not sure If they can be used as tunnels if they are placed on land instead of water. The water on the bridges is close, but needs some tweaking as does the walls.
The roads are a proper 4 cell wide. and when that is rendered that grass can blend in near perfect with RA2 grass
New Bridge.png
Description:
New bridge game
Filesize:
240.55 KB
Viewed:
1897 Time(s)
New Bridge 2.png
Description:
New bridge 3d max
Filesize:
59.57 KB
Viewed:
1899 Time(s)
_________________ I am authorized to send out the TMP Studio, PM ME IF YOU WANT IT And check this out, these were sent to me for help with terrain and zdata help along with TMP Studio/Builder
Nice start. The bridge looks good.
Though i can't put my finger on it, but i have a strange feeling that the perspective is somehow wrong. Something about the roads on the bridge or the bridge itself doesn't looks right. As if the view on the road is from a higher angle (something around 45°) than the normal ground (usual isometric view is 30°).
It might be also the very clean texture only, which makes it hard to estimate the perspective. _________________ SHP Artist of Twisted Insurrection: Nod buildings
It is done in orthographic view, the problem might be that the road is 4 cells wide. That is the proper width. The original 2 lane road was technically 1/2 cell each side and the 4 lane road was 3 cells wide. But it also could be because its FA not in game...so here is in game
in game image.png
Description:
Filesize:
199.69 KB
Viewed:
1829 Time(s)
_________________ I am authorized to send out the TMP Studio, PM ME IF YOU WANT IT And check this out, these were sent to me for help with terrain and zdata help along with TMP Studio/Builder
ingame is no difference to the original art, unless you've added shadows and the game lighting is changed.
I still have that strange feeling of a wrong perspective.
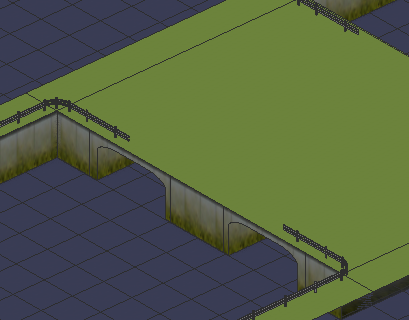
Do you rendered the road texture with the bridge or do you applied the texture afterwards with photoshop? I would assume it's the latter one, as the texture looks quite 2D.
Is that 3ds max screenshot showing the view from the camera with which you also render the scene? If yes, the camera is set wrong. The helper lines in your scene aren't going continuously 2 pixel side and 1 pixel up/down.
Check the camera if it really has a 30° angle down.
I just noticed:
Your lighting setup seems to be wrong. The southeast tunnel is darker than the northwest tunnel which makes me assume you use a point light and not a direct light. A directional light has parallel light beams just like the sun which creates due to its huge distance almost parallel light beams here on earth as well. _________________ SHP Artist of Twisted Insurrection: Nod buildings
I found the proper place to put the piece. I made the bridge, water, top cliff, and road as one. But because of the lighting I do not use the top piece rendered. I bring the cliff top flush with the ground and render it again and bring all to the metal mario temp editor.
As far as comment about second light: I can see that now, did not notice before. I am going to import the downloaded to see if that helps, but there is one thing. I have multi lights. The downloaded templates will not help since I made everything as one big piece. I wanted everything to flow & blend properly. But it could help as far as the camera not sure
I had to make separate lights so everything isnt to bright or to dark. I managed to get the grass and dirt to be pretty damn close to blending. I have a light for the surface, the road, the curbs, the lines just as there are separate planes for each piece for texturing purposes. I'll have to throw up a video showing all the stuff later, but for now this pic shows a top view.
There is another camera not in the view and the yellow line shows the direction it is pointing
LKO.png
Description:
Filesize:
108.92 KB
Viewed:
1772 Time(s)
_________________ I am authorized to send out the TMP Studio, PM ME IF YOU WANT IT And check this out, these were sent to me for help with terrain and zdata help along with TMP Studio/Builder
Don't use multiple lights for certain parts only. This gets confusing over time and produces inconsistent lighting.
Use one or 2 light sources for everything, then adjust the brightness of textures in their material setting.
You can use the output rollout to adjust brightness, contrast and other settings for a certain texture. _________________ SHP Artist of Twisted Insurrection: Nod buildings
The view shown is Realistic so you can see things. This piece renders out for a 26 by 26 image, just to make you aware
The orange light is the surface light
The blue is the guard rail light (which means nothing for this rendering, gonna remove that)
The yellow light is for the cliff sides that should be lighter
The magenta light is for the cliff front that should be darker
The tan cliff top surface (which means nothing for this rendering, gonna remove that)
The green is for cliff edges, something I have hidden not meant for this rendering.
Now like I said, for the guard rail piece I bring it closer to the ground and render that. Go to this link and you will see the road pieces i copy & paste from metal mario
I can't see where you say it looks off. Maybe if you circle the area on the pic I can better understand thet
orthographic angle.png
Description:
Filesize:
84.1 KB
Viewed:
1759 Time(s)
_________________ I am authorized to send out the TMP Studio, PM ME IF YOU WANT IT And check this out, these were sent to me for help with terrain and zdata help along with TMP Studio/Builder
I have to use multi lights because if 1 have one light than the curbs can be too dark where the surface is too light, and the lines might not show at all. Like I said Im gonna have to make a video to show the process I go through, this was you can it as one piece
Edit: I know how to use 3D max, but not enough to use the link supplied. I will look into it. I wont post anything else today till I get my video done so you can see it. Then maybe come up with plan of attack..... thanks for the input so far LKO Last edited by Nikademis Von Hisson on Mon Sep 30, 2013 11:52 am; edited 1 time in total QUICK_EDIT
set "don't antialias against background" in the render options so you have sharp edges (or remove any grey background plane) and i can see if the camera angle is correct.
2 lights are enough
-1 directional light with 0.75 intensity and casting shadows using shadow map
-1 omni light with "ambient only" checked and 0.25 intensity (this is just for some general brightness, so shadowed areas aren't pure black)
If things are getting too dark on certain parts, you have to adjust the material, not the lights. As i said, you just create inconsistent lighting and it makes it much harder for you to fix/change things later. _________________ SHP Artist of Twisted Insurrection: Nod buildings
You cannot post new topics in this forum You cannot reply to topics in this forum You cannot edit your posts in this forum You cannot delete your posts in this forum You cannot vote in polls in this forum You cannot attach files in this forum You can download files in this forum