Joined: 10 Dec 2012 Location: I'm too busy conquering the world!
Posted: Sat Sep 06, 2014 4:16 pm Post subject:
3-D Modelling Practice
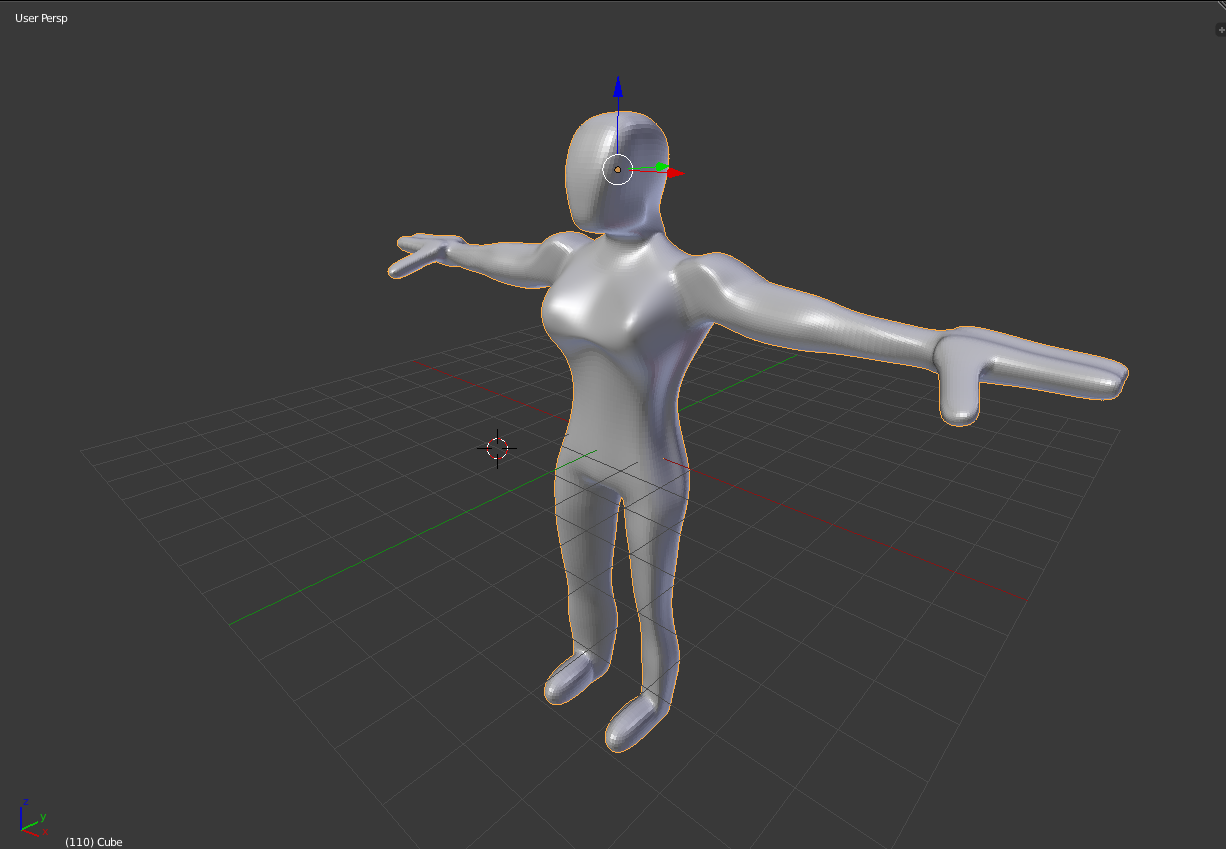
So uh... I finally learned how to 3-D Modelling.
This is the first human model, no texture, it is just for practicing.
Now that I have to come with things in my mind, would it be worth putting extra details on the hands and feets? (such as giving it 5 fingers and 5 toes, which probably won't be seen in-game since it is super tiny)
Also what kind of lighting should I be using to render infantry to SHP?
Another question, how do I make certain things remappable in 3-D model so that the SHP can read it and convert it to remappable as well too?
FirstModel.png
Description:
Filesize:
127.4 KB
Viewed:
2699 Time(s)
_________________ Mod Leader and founder of World Domination
Joined: 22 Nov 2010 Location: Iszkaszentgyorgy, Hungary
Posted: Sat Sep 06, 2014 5:12 pm Post subject:
Regarding remap: it's part of the default texture. You grab a color gradient you certain won't use (by default red, tho IMO green or pink is better, and custompalettes are your friend) and make sure that gradient will be at color 17-32 after imported to SHP.
Because colors 17-32 will get remapped. _________________ "If you didn't get angry and mad and frustrated, that means you don't care about the end result, and are doing something wrong." - Greg Kroah-Hartman
=======================
Past C&C projects: Attacque Supérior (2010-2019); Valiant Shades (2019-2021)
=======================
WeiDU mods: Random Graion Tweaks | Graion's Soundsets
Maintainance: Extra Expanded Enhanced Encounters! | BGEESpawn
Contributions: EE Fixpack | Enhanced Edition Trilogy | DSotSC (Trilogy) | UB_IWD | SotSC & a lot more... QUICK_EDIT
not bad for a first attempt. though you should work on the proportions. (legs look short and the finger too long)
DaVinci's Vitruvian man put on a plane behind the model as a reference can help.
The detail is indeed enough for the tiny SHP result. Just add some cloth details so you don't have a nude girl running around (except that's what you want )
Remap: i suggest using pink/purple like GD mentioned (green is still quite often used on chemical/tiberium textures). take the original unittem.pal, then open it with OS PAL Editor and change the red remap gradient into a pink/purple gradient.
Then take in 3ds max a material and use a pink/purple texture. e.g. a simple Noise map with pink/purple colors.
Then texture the model, put the remap material where you want.
Then use one of the available camera/light setups (like this) so you can render the model in the right perspective and lighting.
Animate the model (using bones and skin modifier) and render the frames.
Finally convert the frames into SHP using SHP Builder and your custom palette.
Not bad for a 1st model, and one thing I do see is that model seems very dense in polys.
I am not sure if its just meshsmooth type of modifier applied to it, but you'd want to keep your polycounts low or just to what you need. Pre-render stuff can slide but really its a good habit of practice to get into, especially later on once you start up the rigging process and UV mapping. It will save for some headaches later
agreeing LKO said and draw up model sheets front view, back, side views, and import them into planes to use as reference and build your model there.
Basically subdivision modeling, adding in edges to get the curves you need for bending and the like.
I would add, It is best to plan it out before you start modeling, and how it will be rigged up, etc. Only then using the necessary amount of polys to convey the basic shape.
As for hands and feet, only if it is worth the effort. Although often used as staple challenge for practicing of course. Making a convincing realistic human that doesn't fall into too deeply into uncanny valley is a major milestone of 3d modeling. Not too different than an artist trying to capture a realistic scene or portrait.
Although for common modeling, you can take short cuts or stylize proportions. Since flat mitten like hands can be hidden with hand textures painted on them..
For RA2 infantry though, if you haven't seen the Official WW infantry thread may check that also. They are just modeled out parts or sections, not unlike Ball-jointed dolls or action figures. Very low poly, but worked out for them. _________________ Delirium.. QUICK_EDIT
http://www.traptcg.com/ _________________ I am authorized to send out the TMP Studio, PM ME IF YOU WANT IT And check this out, these were sent to me for help with terrain and zdata help along with TMP Studio/Builder
your scale seems to be off. measure your forearm, bicep, head, neck to waist, etc and work some kind of scale from there because from what I see the arms could be way to long.... but then again it could be the angle your image is taken from _________________ I am authorized to send out the TMP Studio, PM ME IF YOU WANT IT And check this out, these were sent to me for help with terrain and zdata help along with TMP Studio/Builder
Also IMO too much detail is wasted as well as it bloats up the poly's. Look at the Models tomson found that WW used. Some don't even have much in terms of texturing and the limbs have no digits at all. Try to go for details that would be easy to notice and seen easily. (I.E: The Conscript's Bandolier, GI's Body Armor,etc.) _________________ ~ Excelsior ~ QUICK_EDIT
Poly count doesn't really matter for making these infantry, and any really small details do go to waste, but I would suggest tuning down the divisions of the arms and legs though as arms really only need to be about 1/100th as many polys as you have now, but all that would be for naught if you don't know how to rig it, which I would suggest learning how to do before you go too far as weights and bones are an annoyingly long process.
It is a nice start though, you should definitely read more into body proportions as the torso and chest is pretty strange. I'd provide some tutorials but of course the best course of action is to just keep practicing and to use a plane with a body image behind the model until it starts becoming 2nd nature to make a human body, you already seem to have a nice start on that as the scaling for the arms and legs aren't too far off. It's pretty hard to model organics in stuff like blender or max, so that's understandable too. I use ZBrush for any and all organics myself, so I can't really offer any advice to modeling in blender aside from trying to keep it simple as the more polys you have, the easier it is for it all to go wrong. _________________ "Don't beg for things; Do it yourself or you'll never get anything." QUICK_EDIT
You cannot post new topics in this forum You cannot reply to topics in this forum You cannot edit your posts in this forum You cannot delete your posts in this forum You cannot vote in polls in this forum You cannot attach files in this forum You can download files in this forum